
| Изображение сгенерировано с помощью искусственного интеллекта ChatGPT (OpenAI).
| Предназначено исключительно для иллюстративных целей.
Creating personalized documents is one of the most time—consuming tasks in office work. Imagine that you need to send 500 notifications, each with individual recipient details. It will take hours manually, but with the merge function in Microsoft Word, the task can be completed in 10 minutes!
What is document merging in Word and why is it necessary?
Imagine a situation: you need to send Happy New Year greetings to all 300 employees of the company, and each letter must contain the recipient’s name. Or prepare contracts for 100 clients, where only personal data is changed. Doing it manually is a real nightmare! It is for solving such tasks that the merge function exists in Microsoft Word.
Mail Merge is a smart technology that works as a pipeline for the production of personalized documents. You create one document template with “empty spaces” for data, connect a table with information, and the program automatically creates dozens, hundreds, or even thousands of unique documents.
Simply put: instead of manually copying and pasting every name, address, or other information, Word does it for you in minutes.
Let’s get started with the practice: instructions for merging emails in Word
✅ Step #1
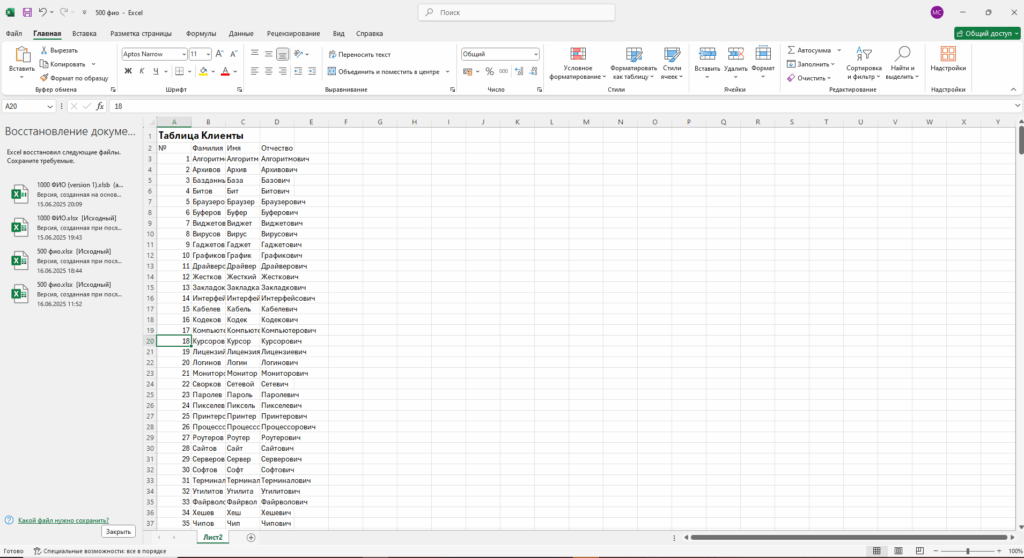
Prepare a table with personal data for merging.
To demonstrate in this manual, I used fictitious surnames, first names, and patronymics. In the screenshot you can see an example of such a table, obtained after unloading from the database. It contains unformatted data, which is typical for automatic information export. Before starting the merge, it is important to make the table neat and readable.
✅ Step #2.
Format the table for merging
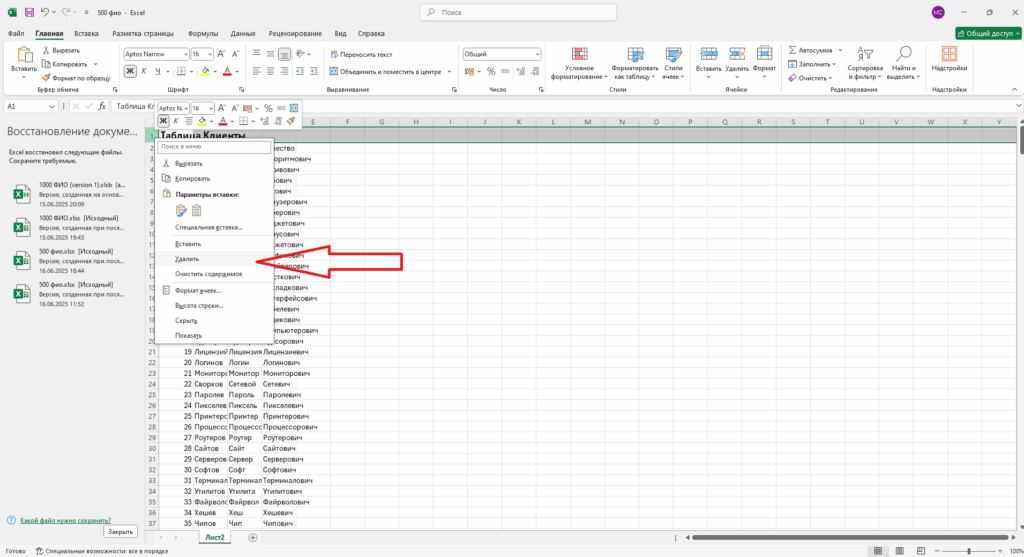
First of all, you need to delete all the rows that are above the column names. This is important because when merging, Microsoft Word will perceive these extra rows as part of the table structure and consider them as separate column headings.
To delete an unnecessary line, select it, right-click and select “Delete”.
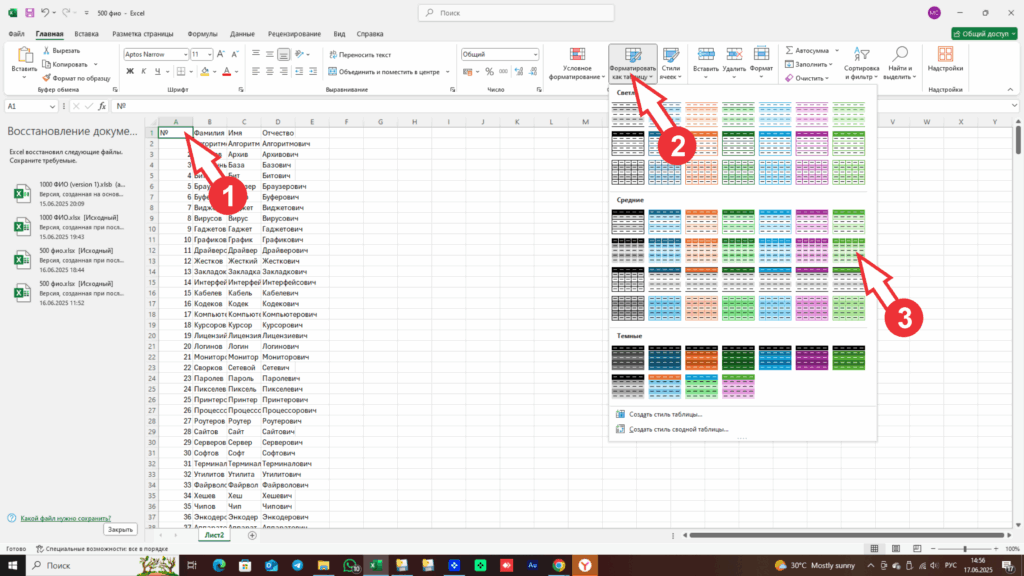
Now let’s bring the table to a convenient and structured view by applying the built-in design style to it. As you can see in the screenshot “Applying Table Styles”, follow these steps:
- Select cell A1 (arrow 1). This is necessary for Excel to understand that you want to convert the current range of data into a table.
- Go to the “Home” tab, then find the “Styles” section, and click on the “Format as a table” button (arrow 2).
- Select the design option you like from the drop-down list of styles (arrow 3). For example, I choose a green style.
After that, your data will be converted into a full-fledged Excel spreadsheet, which is convenient to work with during the mail merge process..
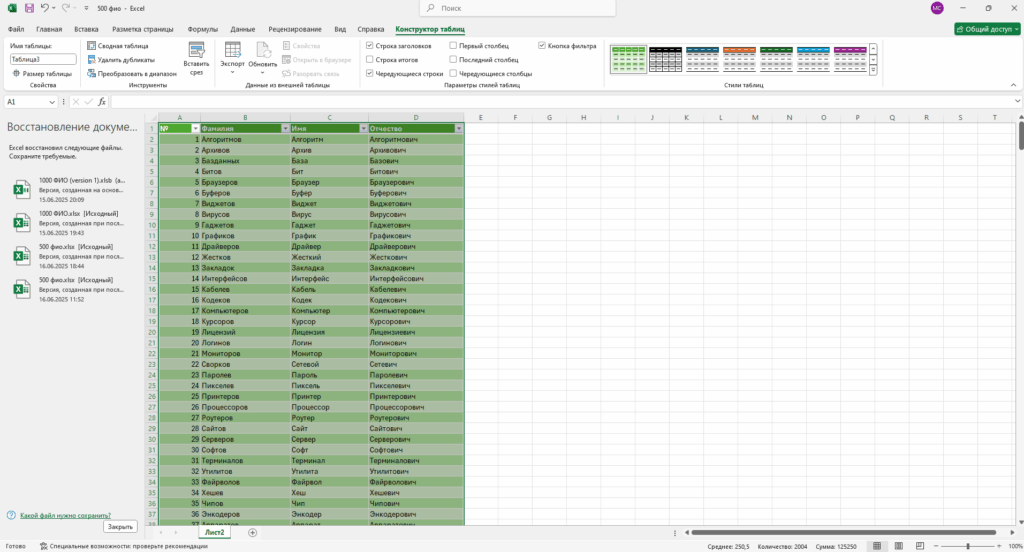
After the table is formatted, we save the Excel file to a convenient location on the computer. Make sure that there is only one table left in the document with the correct headings and data structure.
Now we can switch to Microsoft Word, where we will begin the process of merging and creating personalized emails.
✅ Step 3. Prepare the letter and launch the Merge wizard
To demonstrate, I came up with a fictional letter called “Notification of Special Offers.” Let’s imagine that a certain LLP company decided to inform its regular customers about a product promotion, while personalizing each letter to make the appeal more warm and individual.
To start the merge process, follow these steps:
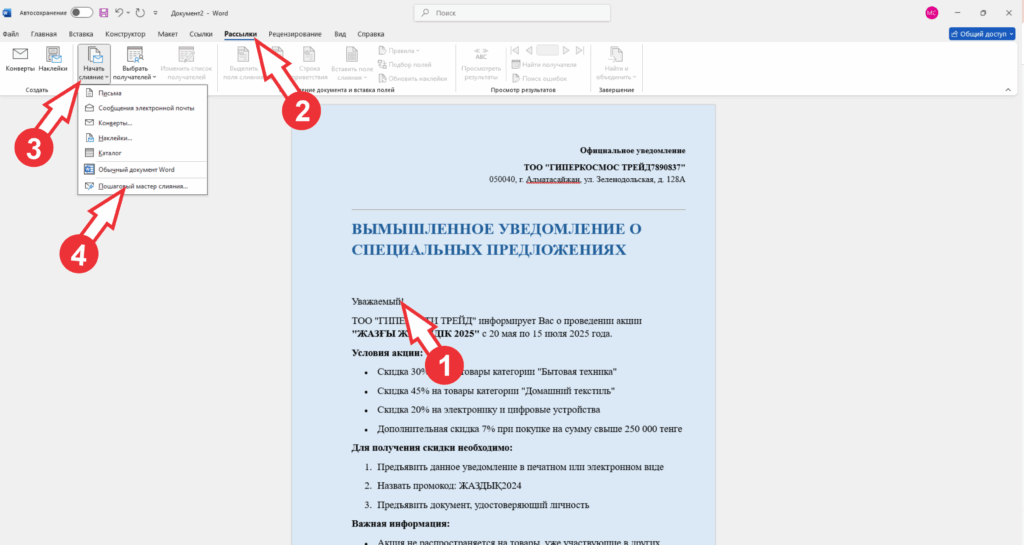
- Place the cursor in the place of the letter where you want to insert data from the table, for example, the last name, first name and patronymic of the client (arrow No. 1).
- Go to the “Newsletters” tab in the top menu of Word (arrow number 2).
- Then click on the “Merge Start” button (arrow number 3) and select “Step-by-step Merge Wizard” from the drop-down list (arrow number 4).
The Merge wizard will help you set up a personalized newsletter step by step, connect an Excel file with data, and insert variable fields (full name, address, company name, etc.) into the appropriate places in the message.
✅ Step 4. Working with the Merge Wizard
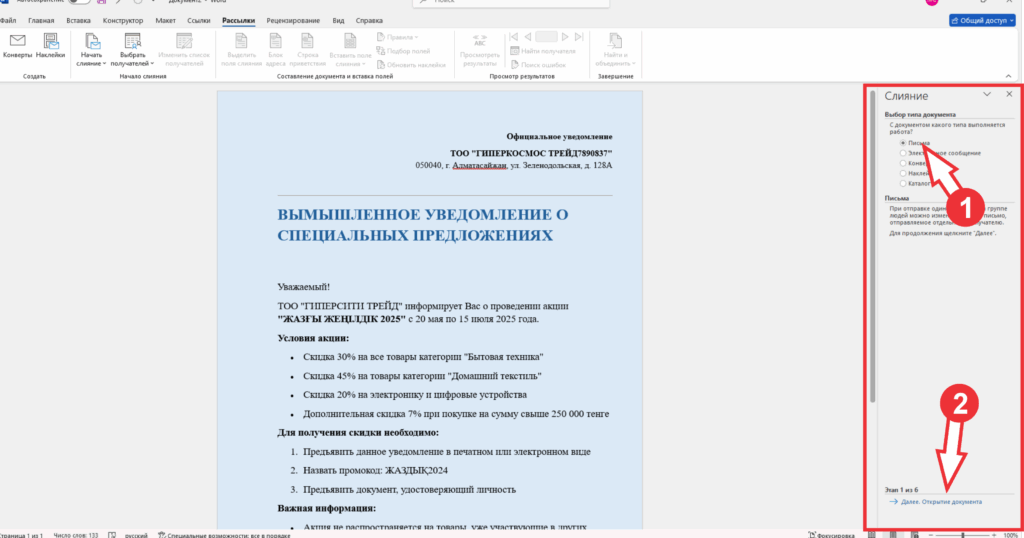
After the actions performed earlier, the Mail Merge Wizard menu opened on the right side of the Word window. This assistant will guide us step by step through the entire process of creating personalized emails.
- At the first stage, we will leave the “Letters” radio button selected (arrow No. 1) — this option is used to create printed notifications.
If you want to send personalized emails, select the “Email Message” radio button then click “Next: Initial document” (arrow number 2).
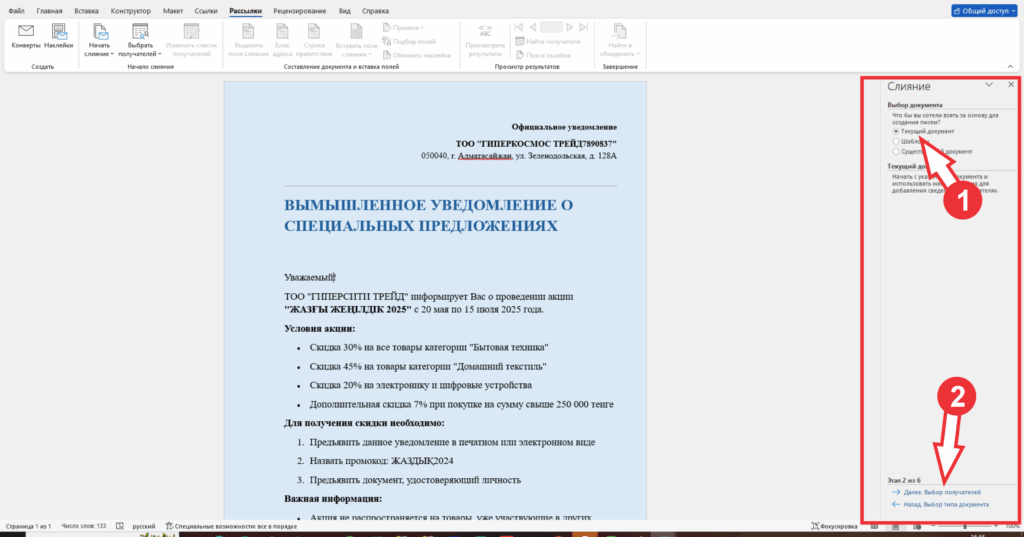
At the second stage, the wizard suggests choosing what to use as the basis of the letter.
Since I prepared the template in advance and opened it in Word, I select the “Current Document” radio button (arrow number 1), and then click “Next: Selection of recipients” (arrow No. 2).
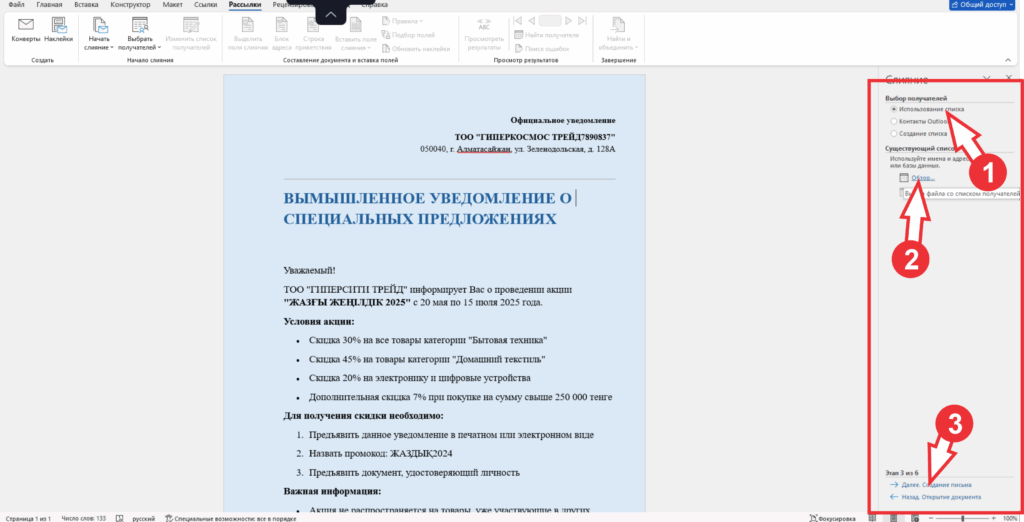
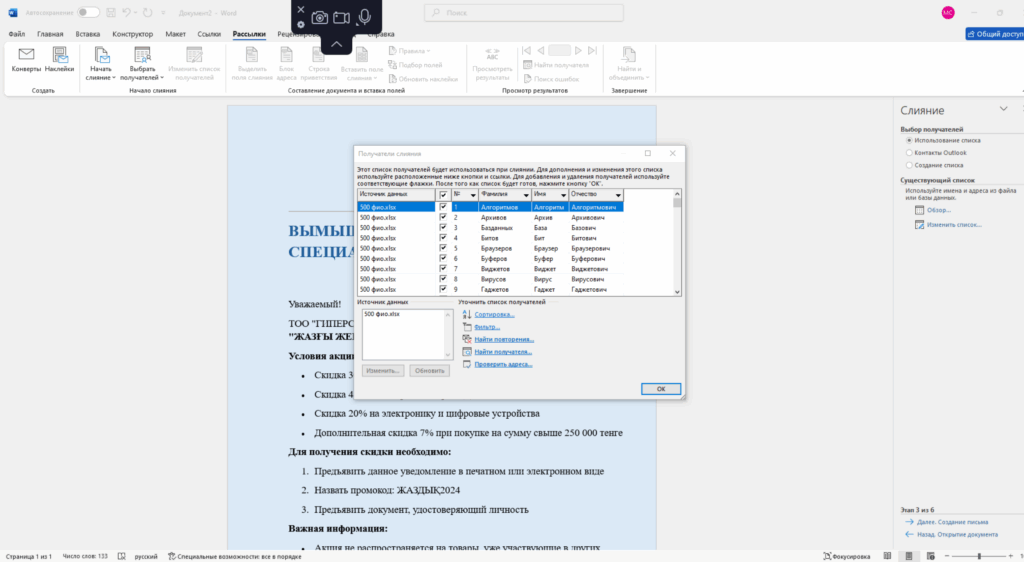
At the “Select recipients” stage, make sure that the “Use list” radio button (arrow #1) is set by default. This means that you will be connecting a pre-prepared list from Excel..
Then click the “Browse…” button (arrow number 2), after which a file selection window will open. Find and select the saved table with surnames, first names and patronymics that you prepared earlier.
After successfully connecting the table, click “Next: Create an email” (arrow number 3).
After selecting the table, the modal “Merge Recipients” window opens, where all rows from the connected Excel file are displayed. Here you can:
- sort the list using the “Sort…” button,
- apply filtering by desired values,
- and also, in my opinion, use the very useful “Find repetitions” function to avoid duplicate mailing lists.
В рамках этой инструкции я оставлю все параметры по умолчанию и нажму «ОК», чтобы перейти к следующему шагу.
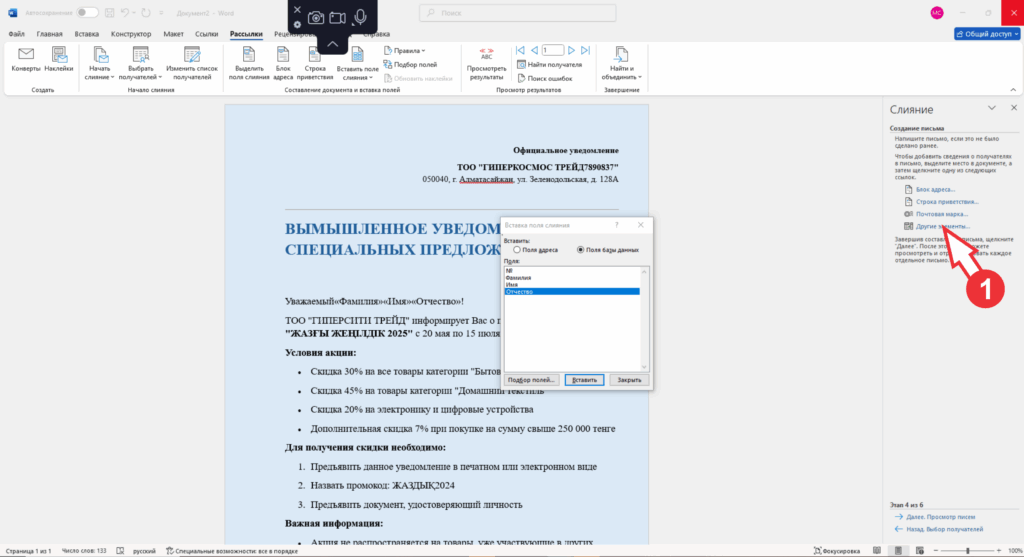
✅ Step 5. Inserting personal data into the text of the letter
At the “Creating a letter” stage, make sure that the cursor is positioned in the appropriate part of the text where you want to insert the recipient’s personal data (for example, before contacting).
Then follow these steps:
- Click on the link “Other items…” (arrow number 1).
- In the “Insert Merge Fields” modal window that opens, select one by one:
- Last name and click “Insert”,
- Name and click “Insert”,
- Middle name and click “Insert”.
- After inserting all three fields, click Close.
- Don’t forget to put spaces between the inserted fields, otherwise the last name, first name and patronymic will merge into one line.
- If necessary, format the inserted fields: increase the font size and, for example, make it red — this will help visually check the result during the preview.
These actions allow you to achieve the most personalized and accurate display of data in an email.
and click “Next. viewing emails”
✅ Step 6. Complete the merge and verify the result
I will skip the “Viewing emails” stage, however, I want to note that at this stage you can:
- exclude a specific recipient using the “Exclude recipient” button,
- and also switch between emails using the left and right arrows to make sure that the data is correctly substituted.
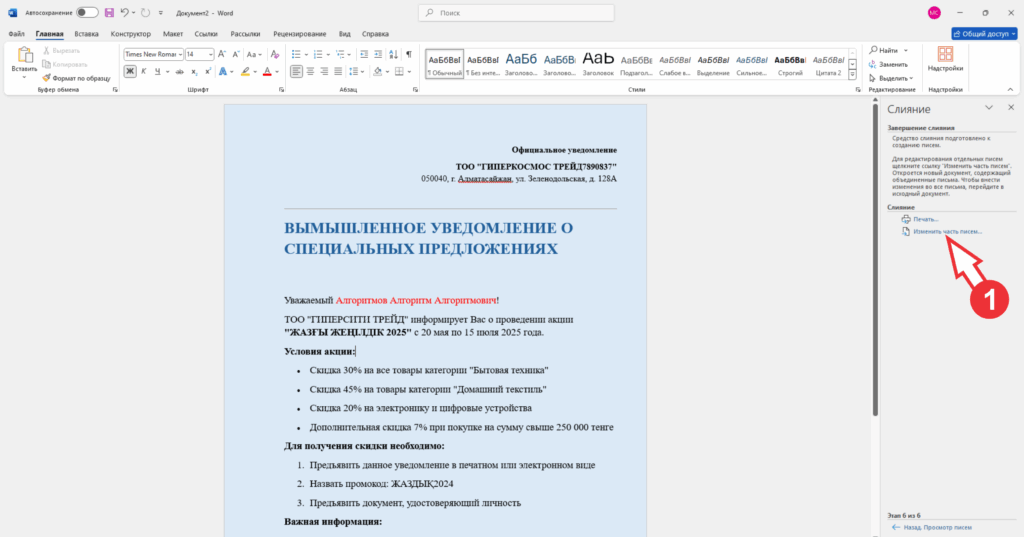
Now let’s move on to the final step — “Completing the merge”.
At this stage, Word offers two options:
- Print the finished letters immediately on paper.
- Click on the “Edit individual documents” link to create a new file in which each personalized email will be formatted on a separate page.
I choose the second option — “Edit individual documents” — to clearly demonstrate that the result was correct.
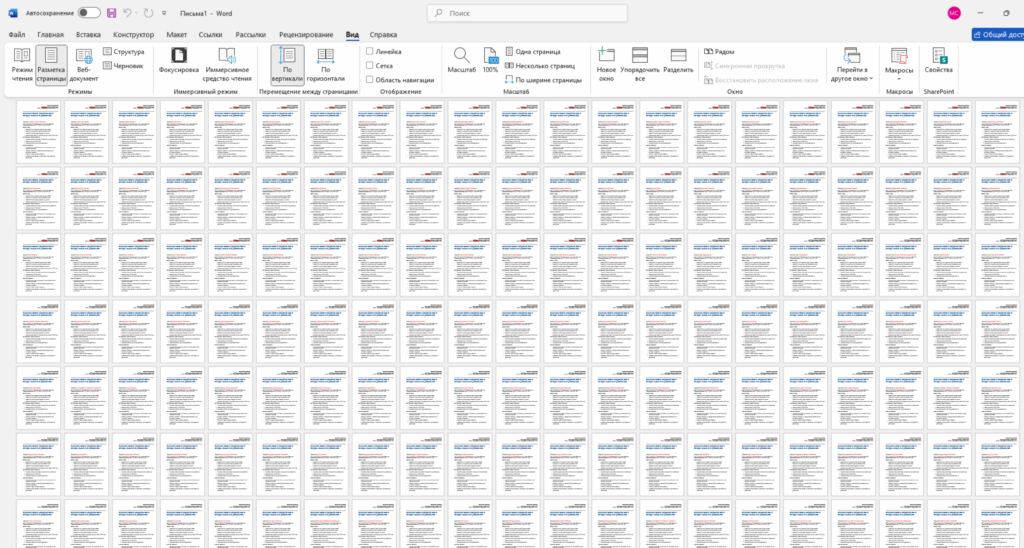
✅ Completion: creation of the final document
In the modal window that opens, I select “All” to generate emails for all recipients. After that, Word automatically creates a new document containing all 500 personalized notifications.
💡tip: if you have a large list (for example, several thousand lines) and your computer is running slowly, it is recommended to split the table into parts of 50-100 lines and create separate documents. This will help to avoid freezes and speed up work on less productive devices.
And lo and behold! — 500 notifications are ready to print, send or save to PDF!
✅ Conclusion
If it is more convenient for you to perceive information visually, you can watch the video tutorial below, where each step is shown in detail and explained in practice.
🎥 In the video you will see:
- how to prepare a spreadsheet in Excel,
- how to set up a merge in Microsoft Word,
- how to insert personal data,
- and how to generate the final emails.
📌 Subscribe to our YouTube channel — There you will find many interesting and useful video tutorials on digital tools, automation, and working with documents. We try to share our knowledge simply, clearly and to the point!
✅ Completion
Thank you for your attention and interest in the material!
We hope this tutorial was helpful and helped you master the email merging tool in Microsoft Word.
✨ See you again in the next lessons!
⚖️ Disclaimer
All data used in this article is fictitious and is provided solely for demonstration purposes.
The article does not contain hidden advertising and does not pursue commercial interests.
The mentioned software products (for example, Microsoft Word, Excel) are not advertised and are used only as part of the training content.
The material has been prepared solely for educational purposes and is not related to the promotion of any brands or services.


