


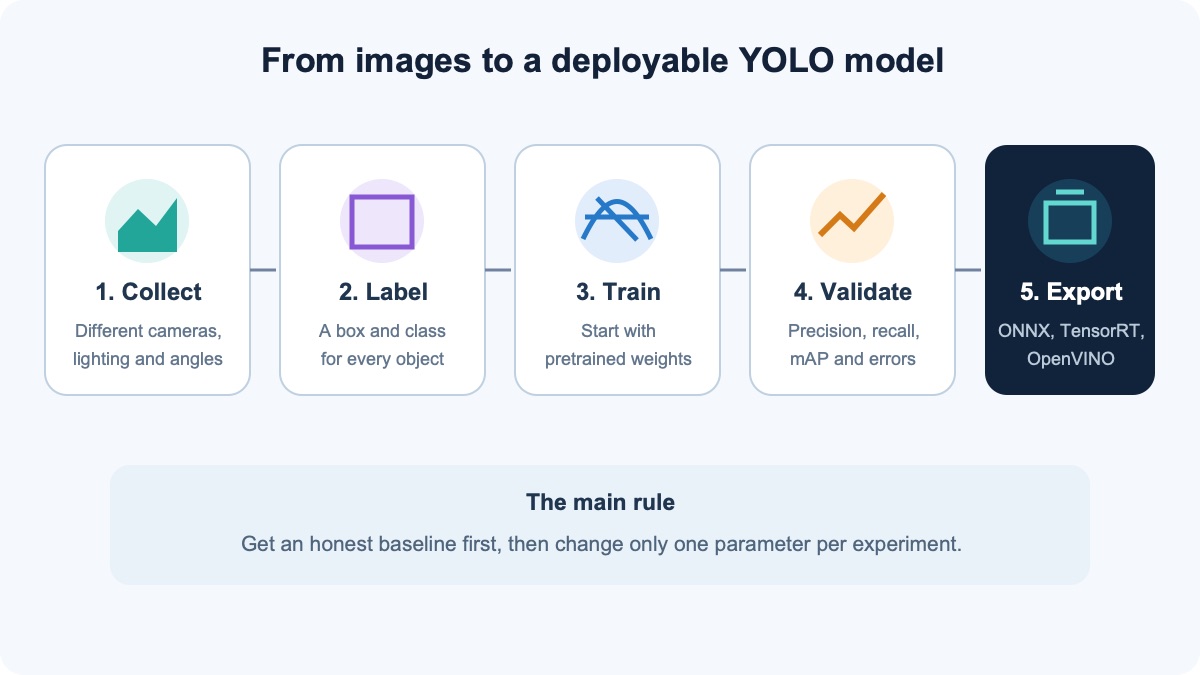
This guide takes you from an empty folder to a custom YOLO26 model: you will install Ultralytics in an isolated Python environment, run a test prediction, prepare a dataset, train an object detector, evaluate its metrics, and export it to ONNX. The commands work on Windows, macOS, and Linux. A capable GPU is helpful, but it is not required to verify the workflow.
Current as of June 22, 2026. The examples were checked against the official YOLO26 documentation and the Train, Val, Predict, and Export guides. The package interface can change, so pin dependency versions for production work.
What you will have at the end
- an isolated Python environment with
ultralyticsinstalled; - a working YOLO26 prediction on an image;
- a YOLO-format dataset and
dataset.yamlconfiguration; - a
best.ptcheckpoint selected by validation performance; - predictions on new images and videos;
- an exported ONNX model for deployment.
Which YOLO version and model size should you choose?
Several independent research teams use the YOLO name, so version numbers do not form one continuous official series. This guide uses Ultralytics YOLO26. Its package provides one CLI and Python API for training, validation, prediction, and export. According to the project documentation, YOLO26 performs end-to-end detection without a separate NMS step by default and is available in n, s, m, l, and x sizes.
| Model | When to choose it | Practical advice |
|---|---|---|
yolo26n.pt | First experiment, CPU, or edge device | Start here to expose data errors quickly |
yolo26s.pt | You need more accuracy with moderate resources | Compare it with nano on the same test set |
yolo26m.pt | You have a GPU and prioritize accuracy | Monitor VRAM and end-to-end latency |
yolo26l.pt, yolo26x.pt | Server GPU and a difficult task | Use them only after a baseline experiment |
YOLO11 and YOLOv8 remain sensible choices for products with an established codebase and tested exports. For a new learning project, start with yolo26n.pt. Move to a larger model only after comparing accuracy on your independent test set and speed on the actual target device.
Requirements before installation
- Python: use a Python version supported by the packages and create a dedicated virtual environment.
- Storage: leave room for dependencies, model weights, the dataset, and the
runsdirectory. - GPU: NVIDIA CUDA can substantially accelerate training; Apple Silicon can use MPS. A CPU is enough for installation checks, but training is usually much slower.
- Data: you need the right to use the images, and they should represent real deployment conditions.
Step 1. Create a project folder and virtual environment
Isolation keeps YOLO dependencies from conflicting with other Python projects. On macOS or Linux, open Terminal:
mkdir yolo-project
cd yolo-project
python3 -m venv .venv
source .venv/bin/activate
On Windows, open PowerShell:
mkdir yolo-project
cd yolo-project
py -m venv .venv
.venv\Scripts\Activate.ps1
If PowerShell blocks the activation script, do not disable protection system-wide. Allow scripts only for the current process:
Set-ExecutionPolicy -Scope Process -ExecutionPolicy Bypass
.venv\Scripts\Activate.ps1
Step 2. Install Ultralytics
Upgrade pip, install the package from PyPI, and print the version that was actually installed:
python -m pip install --upgrade pip
python -m pip install ultralytics
python -c "import ultralytics; print(ultralytics.__version__)"
yolo checks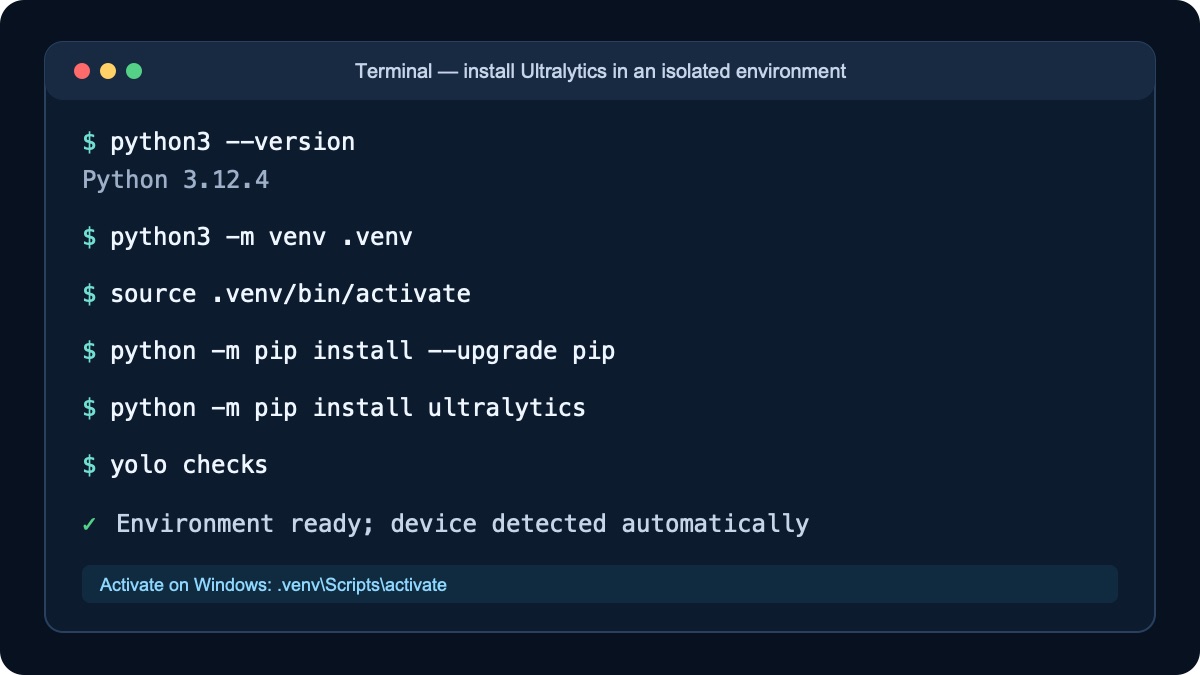
yolo checks verifies the setup.For a Linux server without a graphical display, the official installation guide offers a headless package that avoids GUI-related OpenCV dependencies:
python -m pip install ultralytics-opencv-headlessStep 3. Check CPU, CUDA, or MPS support
python -c "import torch; print('PyTorch:', torch.__version__); print('CUDA:', torch.cuda.is_available()); print('MPS:', hasattr(torch.backends, 'mps') and torch.backends.mps.is_available())"CUDA: Truemeans PyTorch can see a compatible NVIDIA GPU;MPS: Truemeans you can usedevice=mpson a compatible Mac;- if both values are
False, YOLO will use the CPU unless another device is specified.
If CUDA is unavailable, run nvidia-smi first. A failure at this stage is usually related to the driver, the PyTorch build, or the environment—not the dataset.
Step 4. Run YOLO26 on a test image
The first run downloads pretrained weights automatically. This smoke test separates installation problems from later annotation problems:
yolo detect predict model=yolo26n.pt \
  source="https://ultralytics.com/images/bus.jpg" \
  imgsz=640 conf=0.25 save=True
On Windows, you can run the same command on one line. Ultralytics saves results under runs/detect/predict, or in the next numbered directory if it already exists.
Step 5. Define classes and collect images
Write a rule for each class before annotation. For a personal protective equipment detector, the classes might be person, helmet, and vest. Decide how to handle partially visible helmets, reflections, objects printed on signs, and very small instances. More images will not fix contradictory labels.
- cover different cameras, distances, lighting, backgrounds, and weather;
- include hard negatives where a similar object is present but the target class is not;
- do not scatter nearly identical frames from one video across all splits;
- set aside an independent
testsplit that will not be used for tuning.
Step 6. Annotate data in YOLO format
For object detection, every image has a TXT file with the same base name. Each line describes one object:
class_id x_center y_center width heightThe center coordinates, width, and height are normalized by image dimensions and range from 0 to 1. Class numbering starts at zero. The complete format is documented in the Ultralytics detection dataset guide.
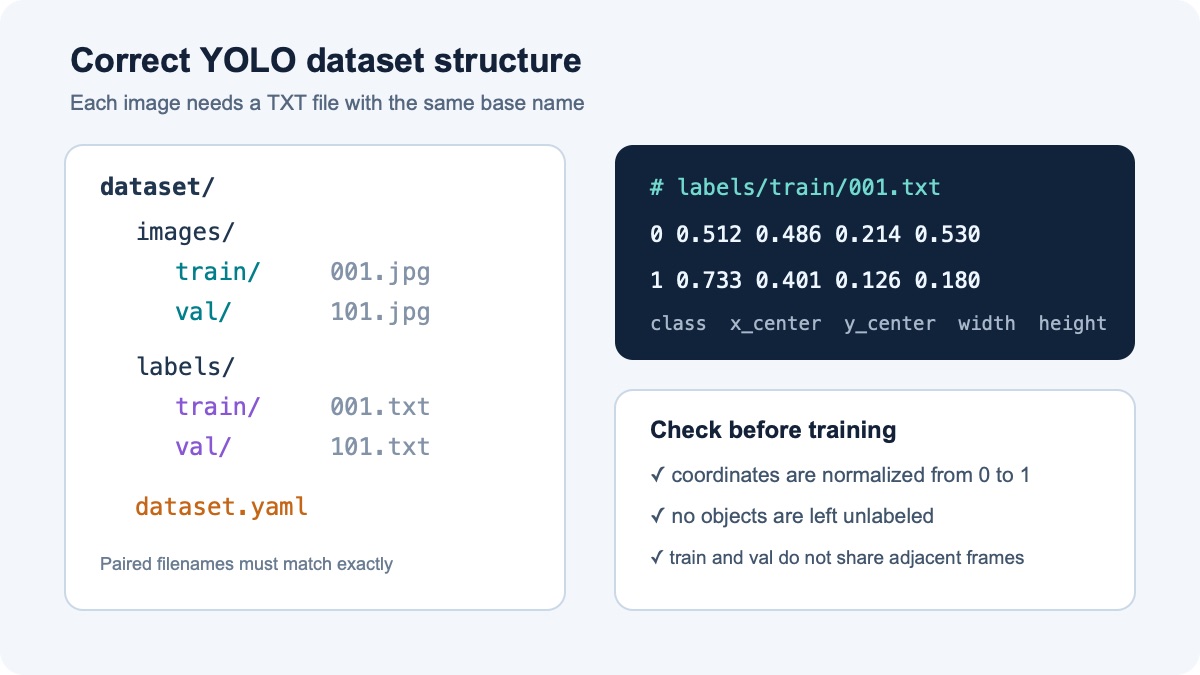
001.jpg and 001.txt must live in corresponding split directories and use exactly the same base name.Step 7. Split the dataset without data leakage
A practical starting point is 70–80% of images for train, 10–20% for val, and the remainder for test. These percentages are not a universal rule; independence matters more. Keep frames from the same scene, camera, or short video together, otherwise nearly identical images can inflate validation metrics.
Step 8. Create dataset.yaml
path: ./dataset
train: images/train
val: images/val
test: images/test

names:
  0: person
  1: helmet
  2: vest
Make sure the names mapping matches class identifiers in the TXT files. If class 2 is missing from YAML, an annotation line beginning with 2 is invalid.
Step 9. Start baseline training
Begin with a pretrained nano model and standard settings. This baseline exposes path, class, and annotation errors before you spend time tuning:
yolo detect train model=yolo26n.pt data=dataset.yaml \
  epochs=100 imgsz=640 patience=20 \
project=runs name=helmet-baselineepochs=100is an upper limit, not a claim that all 100 epochs are necessary;patience=20enables early stopping when quality stops improving;imgsz=640sets the input size; increasing it consumes more memory and does not guarantee better results;projectandnameprovide a predictable output path.
# NVIDIA GPU 0
yolo detect train model=yolo26n.pt data=dataset.yaml epochs=100 device=0

# Apple Silicon
yolo detect train model=yolo26n.pt data=dataset.yaml epochs=100 device=mps

# CPU only
yolo detect train model=yolo26n.pt data=dataset.yaml epochs=30 device=cpu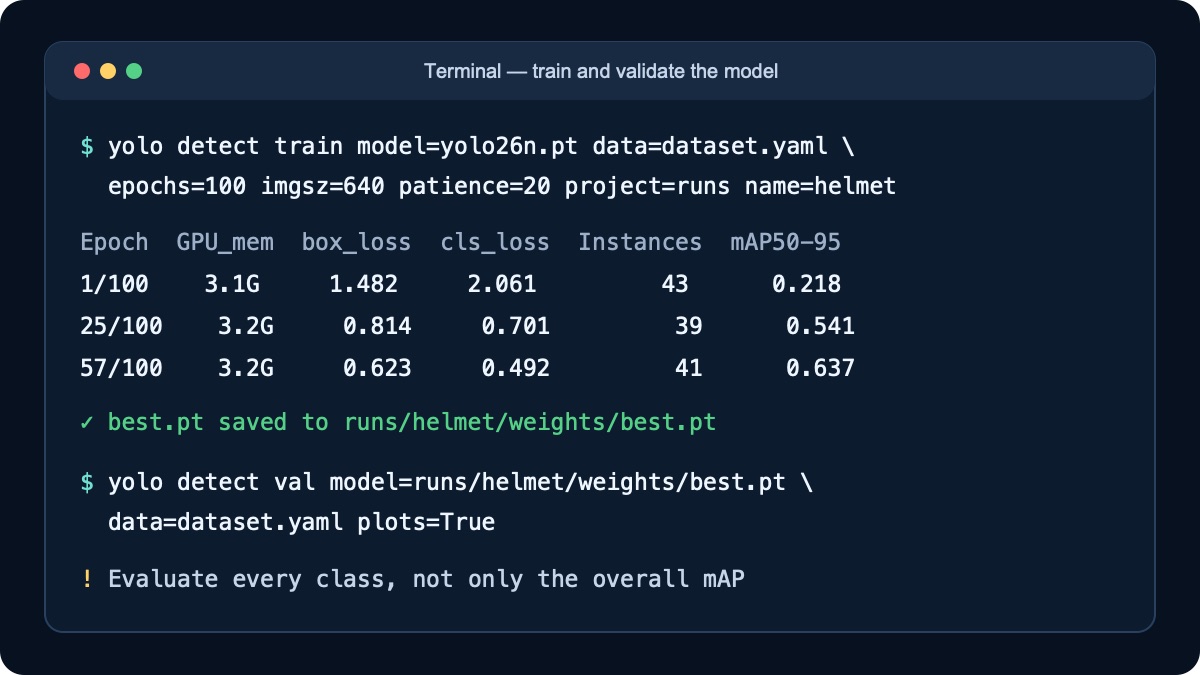
Step 10. Resume interrupted training
yolo detect train resume \
  model=runs/helmet-baseline/weights/last.pt
Do not start a new experiment over the old one. Use the saved last.pt checkpoint and the resume option.
Step 11. Validate best.pt
yolo detect val \
  model=runs/helmet-baseline/weights/best.pt \
data=dataset.yaml plots=True| Metric | What it tells you | What to inspect when it is low |
|---|---|---|
| Precision | How often a detection is correct | False positives, similar backgrounds, incorrect boxes |
| Recall | How many real objects the model finds | Missing labels, small or occluded objects |
| mAP50 | Average precision at a less strict IoU threshold | General class recognition |
| mAP50–95 | A stricter score across several IoU thresholds | Box boundaries and annotation consistency |
Open confusion_matrix.png, results.png, and prediction samples in the run directory. Overall mAP can hide a failure on a rare but important class, so inspect per-class results and review false positives and false negatives manually.
Step 12. Run the model on your own images and videos
# One image
yolo detect predict model=runs/helmet-baseline/weights/best.pt \
  source="test-images/frame.jpg" conf=0.25 save=True

# Video
yolo detect predict model=runs/helmet-baseline/weights/best.pt \
  source="test-video.mp4" conf=0.25 save=True

# Webcam 0
yolo detect predict model=runs/helmet-baseline/weights/best.pt \
  source=0 show=True
Choose the conf threshold according to the cost of errors. Raising it may reduce false positives but can increase missed detections. Tune it on a separate dataset, not one favorable image.
Step 13. Use the model from Python
from ultralytics import YOLO

model = YOLO("runs/helmet-baseline/weights/best.pt")
results = model.predict(
    source="test-images/frame.jpg",
    conf=0.25,
    save=True,
)

for result in results:
    print(result.boxes.xyxy)
    print(result.boxes.conf)
    print(result.boxes.cls)
Step 14. Export YOLO to ONNX
yolo export \
  model=runs/helmet-baseline/weights/best.pt \
  format=onnx imgsz=640 simplify=True
ONNX is a useful portable baseline. TensorRT is common for NVIDIA, OpenVINO for Intel, and Core ML for Apple devices. Export is not the end of testing: compare exported-model predictions with best.pt and measure latency on the actual target hardware.
yolo benchmark \
  model=runs/helmet-baseline/weights/best.pt \
  data=dataset.yaml imgsz=640 device=0
Common errors and practical fixes
FileNotFoundError or dataset images not found
Check the working directory, the path value in dataset.yaml, and filename capitalization. On Linux, Images and images are different paths.
CUDA out of memory
Reduce batch first, then lower imgsz or choose a smaller model. Close processes using VRAM and inspect them with nvidia-smi.
yolo detect train model=yolo26n.pt data=dataset.yaml \
  epochs=100 imgsz=640 batch=4 device=0
The model detects nothing
Temporarily lower conf and inspect raw predictions. Verify class order, annotation coordinates, missing labels, and the difference between new frames and training data.
High mAP but poor real-world performance
Typical causes are leakage between train and val, repetitive data, or domain shift. Build an independent test set from a different camera, day, site, or production batch.
The yolo command is not found
Reactivate the environment and run python -m pip show ultralytics. Make sure python and pip refer to the same environment.
Licensing considerations before commercial deployment
The Ultralytics repository and models are offered under AGPL-3.0 and a separate Enterprise license. Open source does not mean there are no obligations. Before embedding the model in a closed product, review the repository terms, model weights, and distribution method. Seek specialist licensing advice for legally significant decisions.
Frequently asked questions
Can I train YOLO without a GPU?
Yes. A CPU is enough to verify the pipeline and run a small experiment, but training usually takes substantially longer. A compatible GPU or cloud environment is more practical for a serious dataset.
How many images do I need?
There is no universal number. Class difficulty, variety, and annotation quality matter more than raw volume. Start with a small but diverse set, train a baseline, and collect data targeted at observed failures.
Why use best.pt instead of last.pt?
best.pt corresponds to the strongest validation result during the run. last.pt stores the final epoch state and is primarily useful for resuming training.
YOLOv8, YOLO11, or YOLO26?
For an existing product, keep the version whose integration and export have been tested until a replacement passes accuracy, speed, and deployment tests. For a new project, YOLO26 is the current Ultralytics line as of this article; YOLO11 and YOLOv8 remain useful when your required integration is already proven with them.
How do I know the model is production-ready?
It should pass an independent test set, per-class review, difficult and negative examples, full-pipeline latency measurement, and testing on the target device. One high validation mAP score is not enough.
Conclusion
A reliable custom YOLO model starts with a reproducible baseline, not the largest architecture. Install Ultralytics in an isolated environment, verify yolo26n.pt, split your data correctly, train the model, and inspect its failures. Only then should you change model size or hyperparameters. This keeps each experiment interpretable and makes deployment decisions evidence-based.
The featured image was created with a generative model. Step-by-step images are anonymized demonstration screens and diagrams; they contain no real accounts, keys, passwords, or home-directory paths.


Comments on this article